Posts

Showing posts from February, 2012

World at War: Eisenbach Gap - Hell's Wings (Part II)

Image
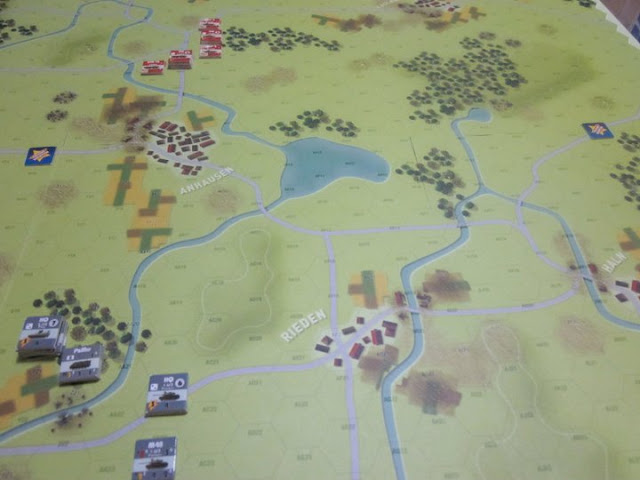
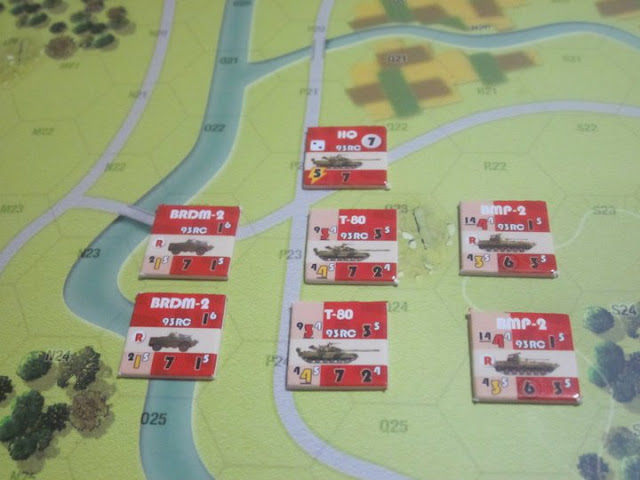
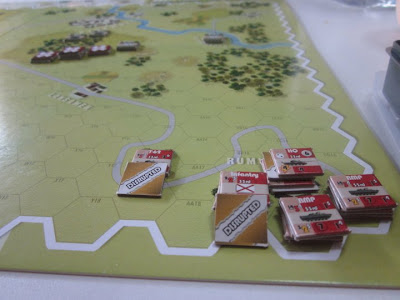
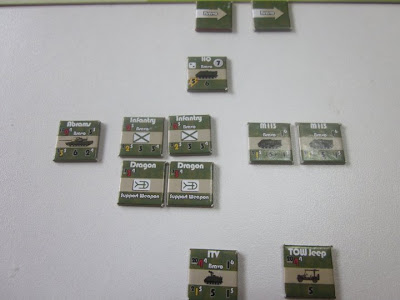
The Americans set up in Eisenbach and Bergpfigel to the west. The Soviet objective is to capture any two cities on the map. Unfortunately for the Americans, the Soviet commander has also pre-designated Eisenbach as a drop zone for his paratroopers. They land in the north of Eisenbach and on the hill to the south. Soviet 2nd AB:  Just dropping in to say hello. American anti-aircraft manages a poor job of taking out Soviet transport planes over the drop zone. Almost all of the infantry, save for 1 platoon, land intact. After landing, the Soviet paratroopers spread out and start seizing key objectives in Eisenbach and the hill to the south. Soviets get lucky again as the 69th Airborne Helicopter Division is activated and swoops in on the battlefield behind a hill north of Bergenpfigel. The Soviet 1st Tank Division enters the fray from the west. The American M1 Tank platoon has set up shop on the hill to the north of Bergenpfigel in an attempt to set

World at War: Eisenbach Gap - Hell's Wings (Part I)

Image
Well, it's time to go back to the Reagan era and do some battle with the commies.  In this scenario, the Americans are tasked with defending the Eisenbach area from some major Soviet attacks.  Here's the OOB. Team Yankee - 2 M1 Abrams tank platoons, 1 infantry platoon with Stinger Anti-Air Missile and an M-113. Team Alpha: 1 AH-1 Cobra due to enter the fray in Round 5. That will be pretty late in the game but it's better than never. Team Bravo: 2 Infantry platoons, 1 M1 Abrams platoon, a TOW Jeep, and a mobile SAM launcher - M48 Chaparral. Soviet OOB: Soviet 2nd Airborne Division. 6 Infantry platoons with an 81mm Mortar section, an SA-7 shoulder-launched anti-air missile launcher, and a Sagger AT weapon. Let the good times roll! Soviet OOB: 2 Mi-24 Hind-E helicopters. Very deadly...you go first. Soviet OOB: 1st Tank Division at full strength. Since this scenario starts on the third day of the war, we get to have full stre

World at War: Blood and Bridges - Separation (Part III)

Image
And... it's Turn 3. The Soviet player immediately pulls a Chaos chit and the result is Friendly Fire! The West German M48s on the hill accidentally open up on the infantry to the west but score no hits before a "blue on blue" warning comes over the radio. The Soviet commander pulls an air strike! The Su-25 marker is pulled. The West German infantry try to destroy the Frogfoot with Redeye SAMs but fail. The Su-25 slams a payload into the M48 HQ sitting at the crest of the hill northwest of Rieden. An entire platoon of M48s is utterly destroyed and the HQ is reduced. The Su-25 rolls to see if it will stick around for another pass but it is low on ammo and returns home. Now the Mi-24 Hinds come into play. They set up behind a hill east of Rieden and conduct pop-up attacks on the remaining W. German tanks that so unwisely positioned themselves on a hill to the west. The other West German HQ commander starts to send infantry up to the exit point whi

World at War: Blood and Bridges - Separation (Part II)

Image
Starting Setup and Objectives: The West Germans must exit off the battlefield to the west via the road from Anhausen (the square blue chit shows you the exact exit point). The Soviets must exit off the east side of the map (not shown). Both sides start very close to the west exit point for the West Germans. The Soviets have to be lucky and quick to catch the Germans before they run off the map. The West Germans have to hope that I pull their formation marker from the cup and they can move to the west with impunity. Hopefully, this will happen before Turn 3 when the Soviet commander gets the 57th AHR (2 Mi-24 Hinds) and the SU-25 air support becomes available. 62nd Soviet Motorized Rifle gets the first activation and quickly moves south to Anhausen to set up shop. The infantry leap out of their APCs and start setting up ambushes near the exit point. That...is not a good sign for the West German commander. Chaos marker is pulled! A downpour starts, reducing all mo

World at War: Blood and Bridges - Separation (Part I)

Image
In this short scenario in World at War:  Blood and Bridges, the West Germans and Soviets face off against each other near the Rhine River. First up, let's go through the Order of Battle: The Soviets get a nice pair of Mi-24 Hind-E helicopters from the 57th Airborne Helicopter Regiment to bring on the pain.  These will ruin your day if you aren't smart about your air defenses. Next up, we get the 93rd Recon regiment, which sports a fast and deadly punch with a pair of T-80s, two BMP-2s, and some BRDMs for good measure. The Soviets also get the 62nd Motorized Regiment with a disappointing set of rusting BTRs with the standard buttload of infantry.  But that's more than made up for with this... an  Soviet Su-25 Frogfoot ground support aircraft and it's available fairly early in the game! Fun for the whole family! NATO gets the West German 1/613th with some ageing M48s and some Marder APCs with infantry from the 2/182 division.

Blood and Bridges: First Contact

Image
This is one of my favorite scenarios from the World at War series, featuring the British and Soviet units scrapping it out in their first fight of the game series.  As usual, let's look at each side's forces before the action starts: Soviet OOB: 93rd Recon Battalion, consisting of 2 companies of sexy new T-80 tank platoons, 2 BRDM-2 scout cars, and 2 BMP-2 platoons. British OOB: The British Royal Lancers - 3 Scimitar tanks and a very deadly Striker. This is a very fast moving light armor company. If it tries to face down the Soviet T-80s, it's toast. The objective is for one side to either destroy more units than the other or exit more units off the opposite map edge. The Soviets enter on turn 1 on the east side of the map and approach the southern lip of Faulbach. The British Royal Lancers have entered from the west side. The British could be in real trouble if they don't play things smart and hit from a distance

Eisenbach Gap: The Defense of Klappebruck (Part II of II)

Image
Without any further hesitation, let's begin with the strange tale of how Klappebruck was won and lost. The Soviets take their lumps from the Americans' long distance fire. It's enough to be annoying but the Soviet HQ gets into position and can now launch artillery strikes on the Americans. As the Soviets, I could have gone one of two ways at this point: I could have chosen to either directly assault the Americans on the hill to the north or try to outmaneuver them and grab the West German cities. Knowing how effective the Soviets can be when played aggressively, I chose to go for the direct assault on the hill where the Americans sat. "Smoke 'em if you got em." The Soviet commander orders artillery to launch a smoke screen to the north on the town of Lansamen and decides to move his forces there to set up a staging ground for an assault on the hill. Thick smoke blocks LOS to the 6 hexes surrounding the town. The Soviet commander

Eisenbach Gap: The Defense of Klappebruck (Part I)

Image
This report is from a playthrough of scenario 2 in Lock 'n Load's World at War: Eisenbach Gap.  Let's start with the Order of Battle: Team Bravo:  The Americans have a couple of platoons of infantry along with some M1 Abrams tanks and some light AT missile launchers in the form of a TOW Jeep and an ITV.  The team is light but its maneuverability and overall concentrated firepower is a decent for match the Soviet numbers. Soviet Order of Battle: 33rd Motorized Rifle Division. 3 platoons of antiquated and slow T-62 tanks. 6 BMPs and 6 infantry platoons. The Soviet objective is to capture Klappebruck and Eisenbach. Soviet 33rd Motor Rifle Div. will enter to the south. The Americans have set up a defensive line along the hills facing this sector. An American platoon with Dragon AT weapons is set up in Klappebruck. The American plan is to devastate the Soviets as they approach the north and then carefully withdraw to Eisenbach. The Soviet 33rd M

Sixth Fleet: Libyan-American War (Part VI of VI)

Image
Turn 6 Day 2: Night This is the last turn of the game and things are going fairly well for the Americans.  The Libyans start off with attacks by the submarines on the US carrier task force.  One of the subs sinks the destroyer, USS Cushing.  The Americans, however, focus their surface fleet on ASW and manage to destroy the two remaining Libyan submarines.  Afterwards, USS Drum finishes off the rest of the Libyan flotilla of fast missile boats. The Libyans put up their remaining MiG-23s on CAP over Benghazi and, as expected, the Americans send out F-18s and EA-6 flight to bomb the city.  The MiGs manage to shoot down a Prowler before being taken out by F-18s.  SAMs destroy an F-18 over Benghazi.  A squadron of A-6s hit Darnah.  Bomb damage is assessed as "barely effective" as both flights miss most of their targets. The United States loses three points for the Libyans sinking their two ships but gains 15 points for hitting all three cities with some effectiveness.  It

Sixth Fleet: Libyan-American War (Part V of VI)

Image
Turn 5 Day 2:  Afternoon The US started off by trying to clear away the Libyan submarines that were skulking around the American task force.  Unfortunately, the results of their efforts were for naught.  Those pesky subs were still there after ASW efforts. The submarine USS Omaha had better luck, destroying two fast attack craft that were near the US carrier task force.  The remnants of the Libyan flotilla shot at the carrier with SSMs but failed to hit anything. The US carrier task force is in the middle.  Very cluttered area! The Americans decided on an all-out air strike on Tripoli this time, sending the entire attack group off to bomb installations around the city.  After the US fighters shoot down the meager number of MiG-23s on CAP over the city, SAMs and AAA took out a pair of F-18s.  Bomb damage was assessed as "largely ineffective".  Still, the Americans did gain three victory points for hitting the city. The Libyans fought back by sending out the remai

Sixth Fleet: Libyan-American War (Part IV of VI)

Image
Turn 4 Day 2: Morning Well, quite a lot happened this morning.  First off, the weather across the Mediterranean was lousy with squalls.    This hampered ship movement and proved to be a fatal development for the Libyans.  The Americans, with all-weather aircraft, were able to deal with the weather without many problems. The Soviets secretly gave the Libyans some satellite photos to show them where the main American task force was sitting.  Believing there is a high chance of another air attack on Tripoli, the Libyans put up a token cap force of MiG-23s over the city. The turn started off with the US carrier task force bombing Benghazi and Darnah.  A-6s with greater range hit Darnah while the F-18s hit key sites in Benghazi. The Americans now have 9 victory points, which is the minimum they need to win this scenario. MiG-23...not so great results vs. F-14 Tomcats The Libyans send out some MiG-23s with the remnants of the Su-20 attack aircraft.  They meet the F-14 Tomcats