Designer's Diary 5: That Others May Live - An Example of Play
This article provides an example of play for That Others May Live using the standard scenario "Caged Tiger" (page 8 / section 7.0). Throughout this Example of Play, I'll be using page numbers and sections (divided by a slash) from the rulebook to highlight specific rules to which I'm referring or that need special attention. A good way to learn the rules is to set up the scenario as below, read through the example, and refer to the rules at each reference point.
The pictures below are from the playtest art, which have only cosmetic differences from the end result. You should be able to follow the example quite easily despite these alterations.
 |
| Setup |
Setup
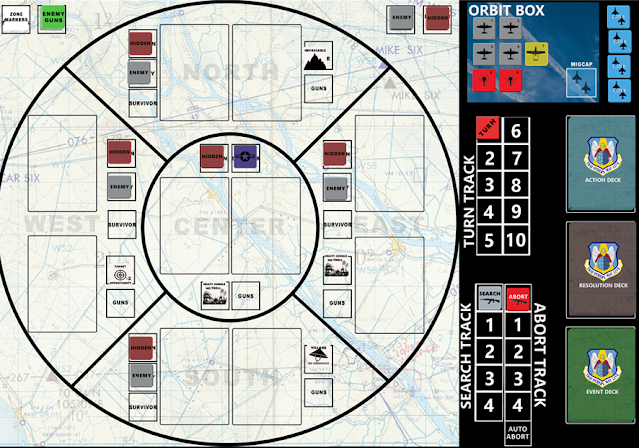
As the Setup specifies, we draw Hidden, Enemy, and Zone markers from their respective draw cups. We place a Hidden marker in each Zone face down. Enemy markers are placed in each Outer Zone. (page 15 / 9.4)
Zone markers are placed in each zone (page 14 / 9.3). Clockwise starting from the North Outer Zone, we have an Impassible marker, Heavy Jungle, Village, and a Target of Opportunity. There's a Heavy Jungle zone marker in the Center Zone.
The Survivor marker is placed on its Healthy side in the Center
Zone.
The Search and Abort markers are on the “0” space of their
tracks. The Turn marker is placed on the “1” space of its track.
Four Sandys, two helicopters, and an FAC are in the
Orbit Box on their “Cool” side.
All three decks (Action, Resolution, and Event) are shuffled
and set within reach.
We select five different Aircraft Action cards from the Action Deck:
- Troll for Fire
- Suppress
- Attack
- Ordnance: Napalm
- Ordnance: Smoke
We choose one card from the Pilots & PJs deck. (page 3 / 2.4.1)
This
mission, I’ll go with a PJ named Pits. I place Pits’ counter underneath the “5”
helicopter counter and set his card aside as a reminder.
Turn 1
Event Phase
This phase is skipped on Turn 1.
Card Phase (page 4 / 4.2)
Draw Action Cards Segment
This segment is skipped on Turn 1.
Reserve Action Cards Segment
I can see two cards in my hand that might come in handy
later during the mission, so I move Ordnance: Smoke and Ordnance: Napalm to the
Reserve.
Resolve Command Action Cards Segment
We have no Command Action cards in our hand so we skip this
segment and move on.
Combat Phase (page 4 / 4.2)
Move Aircraft Segment (page 4 / 4.3.1)
Before sending in the helicopters, I decide to snoop around
and locate the threats. I move Sandys 1 and 3
from the Orbit Box to the South Outer Zone.
Assign Aircraft Action Cards Segment
I assign Sandy 1 the Troll for Fire card and Sandy 3 the Suppress card just in case we pull some heavy fire. I place both cards into
the South Outer Zone and put the Sandy 1 counter on the Troll card and Sandy 3
counter on the Suppress card.

Enemy Gun Fire Segment (page 5 / 4.3.3)
No Enemy Guns are on the map at the moment, so this segment
is skipped.
Play Aircraft Action Cards Segment (page 6 / 4.3.4)
First, I play the Troll card and place it in the Discard Pile.
Following the card directions, I flip the Enemy marker, which reveals a “2” on the back.
We draw two counters from the Enemy Unit cup, an M38 (Firepower
2/1) and a DShK (Firepower 1), and place them both in the South Outer Zone.
According to the Troll card, both newly placed guns must now fire.
My Sandys in the South Outer Zone will be their target.

However, I can use my Suppress card to flip one of the guns over and prevent it from firing. (page 6 / 4.3.4)

Only the enemy DShK can fire, so the Zone Firepower is 1 (page 5 / rule 4.3.3(B).
I draw one Resolution Card (page 5 / rule 4.3.3(C).
The result is a one-crosshair card, which means one hit is scored.
Normally, I can discard (or “burn”) cards in my hand to cancel out hits (page 5 / rule 4.3.3(D). However, one hit will always get through. Might as well hang on to my cards.
We draw Resolution cards to determine which of the two Sandys in the South Outer Zone are hit (page 5 / rule 4.3.3(E).
The first Resolution card has a helicopter icon. Since there are no helicopters in the zone, we keep drawing until we get a card with an aircraft ID in the affected zone. After a few draws, we get a card with the Sandy “1” symbol.
Sandy 1 is flipped from its Cool side to its Shaken side.
Rescue Segment
There are no helicopters in the same zone as a Survivor, so
a Rescue Segment cannot be declared this turn (page 6 / 4.3.5).
End Turn Phase
Bomb Damage Assessment
No hits are scored on Enemy Guns, so we can skip the Bomb
Damage Assessment.
Enemy Search Segment
The Enemy Search Segment is also skipped as the Search
marker is currently at 0.
Abort Check Segment
The Abort marker is on the “0” space of the Abort track so
we skip the Abort check for this turn.
Deck Cleanup Segment
The Attack card in the Player’s Hand is moved to the Action
Card Discard pile.
Marker Adjustment Segment (page 7 / rule 4.4.5)
We follow the Marker Adjustment sequence in the strict order as provided on page 7.
The M38 gun in the South Outer Zone has its counter flipped from its suppressed side to the active side. (page 7 / rule 4.4.5 point 4)
The DShK gun is rotated 90 degrees back to its unfired position. (page 7 / rule 4.4.5 point 5)
The Search marker is moved from 0 to 1 on the Enemy Search Track. (page 7 / rule 4.4.5 point 11)
The Turn marker is moved from 1 to 2 on the Turn Track.
Turn 2
Event Phase
We draw an Event Card and get Flak Trap. An Enemy Gun (a
ZPU – firepower 2) is drawn from the Enemy Gun cup and placed in the Center
Zone.
Card Phase
Draw Action Cards Segment
Two cards are in the Reserve, so three Action cards are drawn and placed in our hand. The three cards are:
- Ordnance: Napalm
- Attack
- Request Aircraft
Reserve Action Cards Segment
The Ordnance: Napalm card is placed in the Reserve.
Resolve Command Cards Segment
I could try and get some help with the Request Aircraft
Action card, but it’s a little too early for that yet. I discard the Request
Aircraft Action card without playing it.
Combat Phase
Move Aircraft Segment
If I had another Troll card, I might check out another Outer
Zone, but time is ticking. Let’s get the helicopters on the map.
I move Sandys 2 and 4 with Helicopters 5 and 6 to the North
Outer Zone. The other two Sandys in the South Outer Zone are moved into the
Orbit Box.

Because we have moved a helicopter into a zone with a face down Enemy marker, we flip over the Enemy marker in the North Outer Zone. (page 4 / Helicopter Movement Special Rule)
It shows a “1”. We draw one unit from the Enemy Unit cup and get a Barrage. The marker is placed in the North Outer Zone.

Assign Aircraft Action
Cards Segment
If we don’t get rid of this Barrage marker by the current turn's Adjust Markers Segment, all the Cool aircraft in the North Outer Zone will be Shaken. (page 15 / 9.5)
To deal with this problem, we assign an Attack card
to Sandy 2.
Enemy Gun Fire Segment
Though there are three enemy guns currently on the map, none of our aircraft are currently in their range. (page 15 / 9.5)
The Barrage marker does not take effect until the Marker Adjustment Segment. (page 7 / 4.4.5 / point 10)
We proceed to the next segment.
Play Aircraft Action Cards
Segment
Sandy 2’s Attack is played against the Barrage and the card is placed in the Discard Pile.
The Barrage marker is removed from play. (page 6 / 4.3.4)
Rescue Segment
None of the conditions on the map allow for a rescue at the
moment so the Rescue Segment is skipped.
End Turn Phase
Enemy Search Segment
The Search Marker is at “1” on the Enemy Search Track, so we have to draw one Resolution Card. (page 1 / 2.1.1)
If it is a rifle icon, our Survivor is captured. (page 6 / 4.4.2)
Luckily, we draw a “Blast” icon.
Abort Check Segment
The Abort marker is still on the “0” space of its track so
there’s no need to conduct an Abort check.
Deck Cleanup Segment
No cards are in the Player’s Hand. The Deck Cleanup Segment
is skipped.
Marker Adjustment Segment
Sandy 1 in the Orbit Box is flipped from its Shaken side to
its Cool side. (page 7 / 4.4.5 - point 9)
The Search marker advances from the “1” space to the “2”
space on the Enemy Search Track.
The Turn marker advances to the “3” space on the Turn Track.

Turn 3
Event Phase
Rules of Engagement is drawn. We need to determine which Outer Zone is affected so we use the Random Determination Method. (page 2 / 2.2.1)
Before drawing a Resolution Card, we mentally assign
the numbers 1 to 5 to North/South and 6 to 10 to East/West.
We draw the Resolution Card, which bears a “26” card number,
which means an East/West result.
A second Resolution card draw will determine whether it’s going to be the East or the West Outer Zone that will get the Rules of Engagement Zone with 1 to 5 as the West Outer Zone and 6 to 10 as the East Zone.
The next card draw is a “14”.
The Rules of Engagement card is assigned to
the West Outer Zone and we place it in the zone as a reminder.

Card Phase
We draw Attack, Smoke Marker, and Request Aircraft.
None of them are reserved.
The Request Aircraft card is played. On the second draw, we
get a USAF roundel, so the request is successful. However, we must draw the
third card as per the Action card instructions, even though we have already
resolved the request. (page 2 / 2.2.1 - Drawing for Resolution)
A Fast Mover is moved from the Fast Mover pool and placed in the Orbit Box on its ENTER side. (page 3 / 2.4)
The Request Aircraft card is placed in the
Action Card discard pile.
Combat Phase
The Sandys and helicopters in the North Outer Zone are moved
into the Center Zone. A Fast Mover is moved from the Orbit Box to the South
Outer Zone.
The Ordnance: Smoke card is moved from the Reserve pile and assigned to the Center Zone. The Smoke Marker card is moved from our hand and also assigned to the Center Zone.
Sandy 2 is placed on the Ordnance: Smoke card
and Sandy 4 is placed on the Smoke Marker card.
The Attack card from our hand and the Ordnance: Napalm card
from the Reserve are placed in the South Outer Zone. The Fast Mover is assigned
to both cards. (page 4 / 4.3.2)
During the Enemy Gun Fire Segment, we conduct the following
steps in order:
Determine Target Zones

Determine Zone Firepower: South Outer Zone (page 5 . 4.3.3 (B)
Now we choose one of the zones and resolve fire.
We decide to resolve fire in the South Outer Zone first.
The
gun with the highest firepower is the M38 (firepower 2). The presence of the DShK
in the same zone adds 1 to the Zone Firepower for a total modified zone
firepower of 3.
Resolve Hits: South Outer Zone
Three Resolution cards are drawn to determine hits.
The first card has a crosshairs icon. The second card also
has a crosshairs icon. The final card, however, has a USAF roundel icon, which
cancels all previously drawn crosshairs cards on the same draw. (page 5 / 4.3.3(C) Luckily, our
Fast Mover is not hit!
With all fire in the South Outer Zone resolved, we move to the Center
Zone and resolve that fire.
Determine Zone Firepower: Center Zone
The ZPU has a firepower of 2, so the Zone Firepower is 2.
Resolve Hits: Center Zone
We draw two Resolution Cards. The first card misses. The
second card is a two-crosshair card. Two hits are assigned to aircraft in the
zone.
Burn Cards: Center Zone
Normally, we could reduce the number of hits from two to one
by discarding a card in our hand or reserve, but we don’t have any cards! Both
hits go through.
Implementing Hits: Center Zone
We draw Resolution cards until both hits have been assigned
to the aircraft in the Center Zone that match the card’s aircraft symbol.
The first hit is scored against Sandy 4 and the second hit
against Helicopter 6. Both are flipped to their Shaken side. The Smoke
Marker card assigned to Sandy 4 is discarded without being played. (page 5 / 4.3.3(E)
Play Aircraft Action Cards Segment
Now it’s time for our assigned Aircraft Action cards to be
played:
Both the Fast Mover’s cards are played. The Napalm card is
played against the M38 (2/1) and the Attack is played against the DShK (1) in
the South Outer Zone.
A hit marker is placed on the DShK gun counter with its “1” facing north on the map. A hit marker is placed on the M38 with its “2” facing north. (page 14 / 9.1)
Note that we could have just as easily assigned both cards to the same
target in the zone and scored three hits on one gun instead.
The Ordnance: Smoke card assigned to Sandy 2 is played in
the Center Zone and discarded. A SMOKE ONE marker is placed in the zone.
 |
Although it would be really nice to declare a Rescue Segment,
we can’t do it because our helicopters have moved earlier this turn. (page 6 / 4.3.5)
End of Turn Phase
During the Bomb Damage Assessment Segment, we resolve the hits scored earlier in the turn (page 6 / 4.4.1).
For the DShK gun, we draw a
Resolution Card and get a crosshair. A miss.
For the M38, we draw a crosshairs card and the wild card. We
decide the wild card is a Blast icon (page 2 / 2.2.1 - Wild Card) and remove the gun from the map.
During the Search Phase, two Resolution Cards are drawn.
Neither sports the rifle icon so our Survivor is okay for now.

Turn 4
We catch a break in the Event Phase when we pull a “No
Event” card.
With one card in the Reserve, we draw four Action cards into our hand:
- Ordnance: Napalm
- Ordnance: CS Gas
- Troll for Fire
- Ordnance: CBU
None are reserved.
Combat Phase
The helicopters and Sandys in the Center Zone stay where
they are. On a hunch, I move Sandy 1 from the Orbit Box to the East Outer Zone
and assign it the Ordnance: CS Gas card.
In the Center Zone, the Ordnance: CBU card is assigned to
Sandy 2. Ordnance: Napalm from the Reserves is assigned to Sandy 4.
During the Enemy Gun Fire Segment, the ZPU in the Center Zone
fires into its own zone. It has a firepower of two, but since there is a Smoke
marker in the zone, this reduces the firepower to just one. (page 14 / 9.2 - Smoke)
We draw one Resolution Card, which bears two crosshairs. Two hits.
We can burn cards to decrease the number of hits, but one hit always gets
through. We burn the Troll for Fire card and move it from our hand to the
Discard pile. The number of hits is decreased from two to one.
We draw a Resolution Card again to see who in the Center Zone is hit.
Oh no! Sandy 4 is hit! It is already on its Shaken side, so now it is removed from play.
The Ordnance: Napalm assigned to the aircraft is placed
in the Discard pile without being played.
To determine Sandy 4’s fate, we draw a Resolution Card to see if it is destroyed or merely shot down. The icon is a roundel, so it is shot down.
The Abort marker is moved from the “0” space to the “1” space on its
track. (page 5 / 4.3.3(E)
Another card is drawn to see if the Survivor will be placed on its Healthy or Injured side. The card number is odd (27) and the Survivor is placed in the Center Zone on its Injured side.
The Play Aircraft Action Cards segment allows for some revenge.
The CBU card in the Center Zone is played (and removed from the game) and the ZPU counter is removed from the map. (page 14 / 9.0 - Cluster Munitions)
Because we have destroyed a gun, the
Abort marker is moved back from “1” to “0”. (page 6 / 4.4.1)
That should make things a bit easier. Sandy 1 in the East
Outer Zone plays its CS Gas card. The card is removed from the game and a CS
ONE marker is placed in the East Outer Zone.
The Rescue Segment begins.
Fortunately, we can declare a
Rescue segment because we have a helicopter in the same zone as a Survivor.
Helicopter 5 will attempt to pick up the Injured Survivor. Helicopter 6 will
try for the healthy one.
Prior to resolving the rescue, all Hidden and Enemy markers in
the current and adjacent zones are revealed and newly placed guns may fire at
eligible aircraft targets. (page 6 / 4.3.5)
The Hidden marker in the rescue’s current zone is revealed
as “0”. No gun is placed in the Center Zone.
In the West Outer Zone, the Enemy and Hidden markers both show
a “1”. A ZPU and DShK are drawn from the Enemy Unit cup and placed there.
The North Outer Zone has a “1” marker. An S-60 (1/2/2) is drawn
and placed there.
An M38 (2/1) is drawn and placed in the East Outer Zone.
Because the M38 is in a zone with CS Gas, it is flipped to its suppressed side. (page 14 / 9.2 - CS Gas)
The only active gun with aircraft in range of its firepower
is the S-60 in the North Outer Zone. The gun has two adjacent zones with
aircraft, so it will fire into the Center Zone, which has the most aircraft
counters. (page 5 / 4.3.3(A)
The Zone Firepower is 2, modified by 1 due to the presence of the Smoke marker.
One Resolution Card is drawn, but it has no crosshairs
icon, so it’s a miss.

Now that all eligible guns have fired, it’s time to resolve
the actual rescue attempts.
We choose to resolve Helicopter 5’s rescue first. We can draw a number of Resolution Cards equal to the number of aircraft on their cool side in the same zone, which is two. (page 6 / 4.3.5)
However, this number is reduced by one
because the Survivor is injured. It is reduced further by the fact that there
is CS gas on the map. What’s more, the presence of the Smoke marker also
reduces the number of draws by one!
Luckily, we always get one draw for a rescue attempt, no
matter how many negative modifiers have been applied. Also, we get an extra
draw thanks to the special ability of the PJ we’ve selected at the start of the
game.
We draw two Resolution cards. Both are USAF roundels! Our
Injured Survivor is stacked with Helicopter 5 to indicate he has been rescued.
Now to resolve Helicopter 6. This time, we have no positive
modifiers to help us out. One card is drawn and the result is a rifle icon. The
rescue attempt fails.
In the Enemy Search Segment, we need to draw three Resolution cards to see if our Survivor is captured.
Luckily, we can reduce the
number of draws by one by discarding the Ordnance: Napalm in our hand. Two cards
are drawn and none of them bears a rifle icon.
In the Marker Adjustment Segment, the SMOKE TWO marker is removed from the map. We flip the CS Gas Marker from its ONE side to TWO side. The Fast Mover on its Exit side is removed from play. The Search marker is advanced to “4”.
Our Turn marker advances to 5.
Turn 5
We draw a Hydraulics Failure as our event. After drawing
Resolution cards to make a random determination of which aircraft is affected, Sandy
2 suffers a hit and is flipped to its Shaken side.
Our five drawn Action cards are:
- Request Aircraft
- MIGCAP
- Suppress
- Mark Target
- Attack
The Attack card is moved to the Reserve.
We play the Request Aircraft card and it succeeds. A Fast
Mover is placed in the Orbit Box on its ENTER side. Since we have a MIGCAP
card, we choose to play it and move the newly placed Fast Mover into the MIGCAP
box. This will give us some insurance against a MIGS! Event.

It’s time to move Sandy 1 into the Center Zone. That pesky
S-60 in the North Outer Zone needs to be taken out. I have a special plan for
it. The FAC and Sandy 3 move from the Orbit Box into the North Outer Zone.
For the Assign Aircraft Action Cards Segment, I place Mark
Target and Suppress in the North Outer Zone. The FAC is assigned the Mark Target
card and the Sandy gets the Suppress.

During the Enemy Gun Fire segment, the Suppress card is
played before the S-60 can fire. With the S-60 suppressed, the FAC can safely
mark it. A MARK ONE counter is placed on the gun.
Without any incoming fire into the Center Zone this turn, we
might finally catch a break and rescue that second Survivor.
During the Rescue Segment, Helicopter 6 is chosen to try and
rescue the Survivor. Although it would have made more sense to use Helicopter 5
with its extra draw, we’ll give the crew of Helicopter 6 some of the glory too
just for the sake of this example of play.
Helicopter 6 gets one draw only. We get a roundel!
The
Survivor marker is stacked on Helicopter 6. And not a moment to lose. With no
stranded Survivors on the map, the marker on the Search Track is returned to
zero.
Since there are no stranded Survivors on the map, we skip
the Enemy Search and Abort Segments. (page 6 / 4.4.3)
During the Marker Adjustment Segment, the CS TWO marker is
removed from the map. The MARK ONE counter is flipped to its MARK TWO side.
Now that the CS marker is gone, the M38 in the East Outer
Zone is flipped back to its Active side. The S-60 in the North Outer Zone is
also flipped to its active side.
The Fast Mover in the MIGCAP box stays there for the rest of
the game, so we don’t need to flip it or remove it from its box.
No stranded Survivors are on the map, so the Enemy Search
marker is not moved. (page 7 / 4.4.5 - point 7)
All that’s left to do is move the Turn marker ahead to Turn
6.
Turn 6
This turn’s Event is also a No Event card. Another lucky draw!

- Request Aircraft
- Troll for Fire
- Ordnance: Napalm
- Ordnance: CBU
We reserve the Napalm and keep the Troll for Fire and CBU card
in our hand.
Our request for aircraft succeeds and the Fast Mover is
placed in the Orbit Box on its Enter side.
It is time to get out of Dodge! All four aircraft in the
Center Zone move to the South Outer Zone. The FAC returns to the Orbit Box.

We discard the Troll for Fire card in our hand to bring the result down to one crosshair. The remaining hit is assigned to Helicopter 6, which is already Shaken.
The helicopter is removed from the map. A Resolution
card is drawn to check for aircraft destruction. The symbol is a crosshair – a
shoot down. The next card we draw is odd-numbered, which means our Survivor is
injured.
The Abort marker is moved from “0” to “1”.
What a disaster.
The Aircraft Action Card Segment begins and the CBU card is
played, which destroys the M38 in the East Outer Zone. The enemy gun counter is
immediately removed from play along with the CBU card. A Cluster Munitions
marker is placed in the East Outer Zone. The destruction of the M38 moves the
Abort marker back from 1 to 0.
The Attack card in the North Outer Zone is played. Normally,
we would assign one hit to the S-60, but it is marked with a MARK TWO counter
and is assigned two hits instead. (page 14 / 9.2 - Mark Target)
The Rescue Segment begins, but since our helicopter in the
South Outer Zone has moved this turn, we cannot declare a rescue.
In the Bomb Damage Assessment Phase, we draw two Resolution
cards. Both cards are roundels. The S-60 remains unaffected.
During the Marker Adjustment Segment, the hit marker is
removed from the S-60 along with the MARK TWO marker. The Fast Mover is flipped
to its Exit side and returned to the Orbit Box. The Enemy Search marker is
moved from 0 to 1. The Turn marker is moved ahead to Turn 7.

This turn’s event is a Search Party. The Search marker is advanced
from 1 to 2 on the Enemy Search track.
With one card in the Reserve, we draw four action cards this
turn:
We get:
- Move Survivor
- Exfil Team
- 2 x Mark Target
We can’t play the Move Survivor or the Exfil Team cards
because our Survivor is injured. Both cards are discarded.
During the Move Aircraft Segment, Sandy 3 is moved from the
North Outer Zone to the Orbit Box. The FAC and the Fast Mover are both placed
in the North Outer Zone. Sandy 2 moves from the South Outer Zone to the Orbit
Box in hopes of regaining its Cool status later in the turn.
In the Assign Aircraft Action Cards Segment, the FAC is
assigned a Mark Target and the Fast Mover gets a Napalm card. The remaining
Mark Target in our hand will be used as a burner in case anyone gets hit.
The S-60 will fire into its own zone (the North Outer Zone)
at the Fast Mover and FAC. The DShK will fire into its own zone (South Outer
Zone).
We decide to resolve the North Outer Zone fire first. Two
cards are drawn for the S-60. The first has four crosshairs on it. Oh no. The
second card is a roundel, which cancels all previously drawn crosshairs when
drawing for enemy fire in a single zone. No hits are scored against our
aircraft in the North Outer Zone.
In the Aircraft Action Segment, the FAC marks the S-60 and a
MARK ONE counter is placed. The Fast Mover plays the Napalm card and scores four
hits (two hits from the Napalm card are doubled by the marked target). The
Napalm card is removed from play.
We draw one Resolution card for fire in the South Outer Zone
and it’s a blast icon. No hits are scored.
During the Rescue Segment, Helicopter 5 attempts a rescue.
Neither card has a roundel, so the attempt fails.
During the BDA Segment, four cards are drawn to see if the
S-60 is destroyed. The first card is a blast icon, so the gun will be
destroyed. However, we still need to keep drawing the remaining three cards
anyway. The next card is a Reshuffle card.
The Resolution Deck is reshuffled and the second card is
drawn, which is a crosshairs icon. The next two cards are blast cards. The S-60
is removed from the map along with the MARK ONE marker. The Abort marker moves
back from 1 to 0.
During the Enemy Search Segment, we need to draw two
Resolution Cards. We burn the Mark Target” card in our hand, which reduces the
number of draws to one. The card turns
out to be a “Blast” icon and our Survivor is safe.
In the Marker Adjust Segment, the hits marker is removed from the map (page 7 / 4.4.5 / point 1).
The Fast Mover is also removed from the map.
Sandy 2 in the Orbit Box is flipped back to its Cool side.
The Enemy Search marker moves to 3.
Our Turn marker moves to 8.
Turn 8
The Event is Reinforcements. An Enemy gun (ZPU) is drawn and
placed in a random Outer Zone, which turns out to be the West Outer Zone.
With no cards in Reserve, we draw five Action Cards:
- Broken Arrow
- 2 x Suppress
- Attack
- Troll for Fire
It would be great to use the Broken Arrow card on the guns
in the West Outer Zone to suppress all the guns there. However, the Rules of
Engagement card prevents this.
We also cannot play it into the South Outer Zone with our
Survivor still on the ground. Sadly, the Broken Arrow card is placed in the
Discard pile without playing it.
Hoping for the best, I move Sandy 2 and 3 from the Orbit Box
to the South Outer Zone. The FAC moves back to the Orbit Box.
Sandy 3 is ordered to suppress the DShK while Sandy 2 will
attack it. The gun is flipped to its suppressed side and a hit marker is placed
on it.

The Rescue Segment begins and the Enemy marker in the West
Outer Zone is revealed. Thankfully, it’s a “0”, so no new enemy guns are
placed.
This time, Helicopter 5 has a total of four draws (four Cool
aircraft in its zone, minus one for the injured Survivor, plus one for the PJ).
We get a roundel and the Survivor is on board Helicopter 5. The Search marker
is returned to 0.
The BDA Segment gives us one draw for the DShK but no blast
icon is drawn. The stubborn gun stays where it is. During the Marker Adjustment
Segment, the hit marker is removed and the gun is flipped back to its active
side. The Turn marker moves to Turn 9.
Turn 9
The Event is Evacuation. Village markers are removed from the map and ordnance may now be dropped in these zones.
In the Draw Action Cards Segment, we draw:
- Request Refuel
- Troll for Fire
- Attack
and now the Action Deck’s draw pile is exhausted. We
reshuffle the Action card discard pile and use it as a new draw pile. Two more
cards are drawn:
- Smoke Marker
- Suppress
The Request Refuel card is placed in the Discard Pile without
playing it.
During the Move Aircraft Segment, we move all four aircraft
from the South Outer Zone to the Orbit Box. Since no aircraft or Survivors are
on the map, the game is effectively over at this point.
All of our Survivors have been safely rescued and moved off
the map. No aircraft have been destroyed (although two have been shot down).
This mission is a win for the player! (page 7 / 5.0)


Comments
Post a Comment