Extended Example of Play - Eisenbach Gap: First Moves
With the upcoming re-release of Eisenbach Gap from Lock 'n Load Publishing, I thought I would provide an extended example of play to help new players quickly dive into the system. It's not very complex but since this was my first wargame ever, it was a bit of work for me to initially wrap my mind around the rules, terms, and concepts.
So here goes - a detailed narrative of a single turn of play using "First Moves" as a learning scenario for World at War. I'm playing this on Vassal, which is not my favorite way of playing this particular game but it should work fine anyways.
In "First Moves", the Soviets have two victory objectives. They must capture the towns of Bergengipfel and Eisenbach. The Americans win if they can stop them. Note that the term "capture" denotes that a side was the last to move units through the hex. You don't need to keep your units in the hex all the time for it to be considered captured.
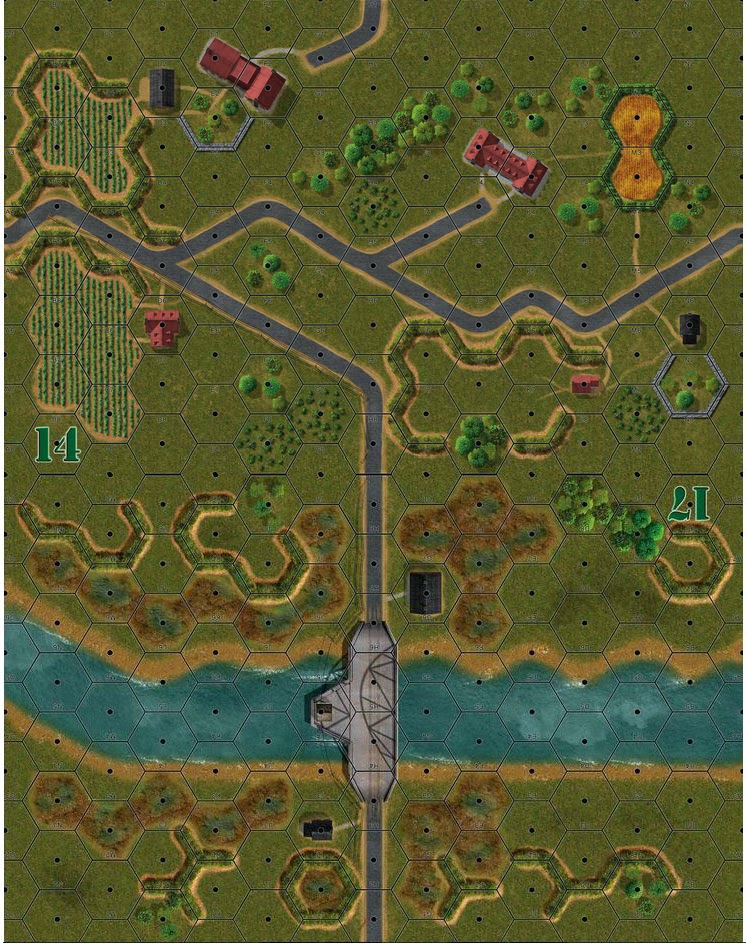
So let's look at the setup. Although there is more to the map than this, we'll be restricted basically to this play area.

The Soviet side gets the 1st Tank Division, which has one unit type only - the fearsome T-72 tank. The 1st Tank gets 10 platoons of T-72s plus a headquarters. HQs have various functions but their most important feature is the ability to command and send orders. Protecting your HQ and using it wisely is central to victory in World at War.

The American forces, on the other hand, couldn't be more different. Here we have Team Yankee, which consists of a varied bunch of units from M1 Abrams right down to infantry with handheld anti-tank launchers.

At first glance, it looks like 1st Tank is gonna roll over Team Yankee and spit out their treads but have no fear, American player! Team Yankee has two formation chits while the 1st Tank only has one chit. This means that the 1st Tank can only activate max once per turn while the Americans might activate up to twice in a single turn. This advantage reflects the better equipment, training, technology, and command flexibility of NATO over its Soviet adversaries.
Setup:
The American set up first on the map:

I put the infantry with the Dragon AT weapon and the M113s just south of Bergengipfel, ready to repel any attack into the city. Team Yankee and the HQ goes on the hill to the southwest of Eisenbach and the ITV is hanging out in the forest to the north of Eisenbach. As the NATO player, it's always a good idea to set your forces back from the Soviets as you have a real advantage with range.
Now it's time for 1st Tank to get set up. In this scenario, 1st Tank can set up forces anywhere within 3 hexes of hex C3, which is up in the northwest of the map.

The Soviets set up very aggressively, ready to strike at Team Yankee! Each T-72 platoon (1 counter = 1 platoon) is stacked with another T-72 counter (2 units max per hex at all times). The HQ does not count towards stacking limits and is stacked in the eastern part of the city with two T-72 counter.
This maybe isn't the greatest Soviet setup for this scenario, but hey, it's just a tutorial so that works fine.
Let's start the game, shall we?
Turn 1 Begins!:
The Soviets get to go first without having to pull a formation chit from the cup. Thanks to the surprise attack, NATO is caught off guard and the Russians activate. The first thing the Russian HQ does is call down artillery on the American Abrams and the HQ sitting exposed on the hillside just south of Eisenbach. The Soviets have 4 fire missions but they can only call in 2 per turn as the first action of the HQ unit. Only the HQ can call in artillery and it needs a line of sight to the target. All the requirements are made, so we roll to make sure the artillery lands in the target hex.
The Soviets roll a "2" and the HE lands right on top of the American HQ. Good opening, comrade! Now let's see if the artillery manages to score any hits.
The artillery is high explosive and is 3(4) power. This means we get to roll 3 six-sided dice. We need 4 or higher to score a hit. The dice come out as 3, 4, and 5. We manage to score 2 hits. Since the US units are not in any terrain that offers defensive cover, they don't get to roll to negate any hits. Since we have two units in the hex (the HQ does not count as a unit), the hits have to be distributed equally among them. As a result, each unit takes one hit so both Abrams units are disrupted.
Since the HQ unit has taken a hit, it must roll to see if it is damaged. On a roll of "1", the HQ will be reduced and this will affect it's command rating and abilities.
We roll a "1" and indeed the Americans HQ is damaged. We flip over the American HQ unit to see its new values.
The Soviets have launched a nice opening attack that has devastated Team Yankee. They could fire another artillery barrage at the US tanks but this would be a waste since "hard targets" (basically armored vehicles) cannot be reduced further than the "disrupted" state by HE artillery.
It may be a much better idea to use one smoke mission for our next artillery strike so that the ITV sitting near Eisenbach cannot disrupt movement to the target.

The Soviet HQ calls for a smoke mission in K6. Once again, we must roll one die to see if the smoke mission lands on target. If we get a "6", the other player can move the smoke marker one hex in any direction. Lucky for the Soviets, they get a "1" and the smoke mission lands exactly where they want it. The smoke will remain for two turns before it clears and it covers the target hex and the six adjacent hexes. The ITV has thermal sights so it can still fire into the smoke but it's "to hit" rating is increased.
The Soviets start off by moving their HQ and the two tank platoon with which it is stacked down the road and into J6. This keeps the HQ out of LOS from the ITV's opportunity fire, which is a bit conservative for a Soviet player but it's always a good idea to be more careful with moving an HQ unit.

The rest of the 1st Tank units can now be moved in any order. Note that had we not called in artillery, we could have moved/fired any of the other units first before the HQ but because we led off with the artillery barrage from the HQ, we must now move it before the others or not at all for the remainder of the activation.
The tank units in E5 move towards the hill nearest Bergengipfel. As they enter hex J7, they are in LOS of Team Yankee's ITV unit. The ITV unit may use opportunity fire to shoot at one unit in the stack since the enemy T-72 platoons in J7 are in range and LOS (check LOS by stretching a thread or elastic from the center of the firing hex to the center of the target hex) of the ITV.
The ITV has a range of 20 hexes and rolls 4 dice for a 4 or above to hit. However, since the ITV is firing through the smoke, the "to hit" number is now 5 or above so we're rolling 4 dice for 5+ to hit. Let's go.
The ITV rolls a 6/4/1/1 on the dice. So we've scored one hit! Hooray for NATO! However, the Soviet tank platoon can now roll to negate the hit. Without any cover or concealment, the Soviet T-72 platoon rolls 4 dice and negates a hit on a roll of 6. The Soviets roll a 1/3/1/2 on the dice. The hit is not negated and one of the Soviet tank platoons in J7 is now disrupted. It may not move although the tank unit that it is stacked with may do so. It climbs the hill into hex K9. Since we're climbing a hill, this costs 2 movement points instead of 1 and the Soviet tank platoon stops, having expended all of its 7 movement points for this activation.

Now let's get all the rest of the guys moving. The Soviet tank platoons remain stacked throughout their movement and do not come under any opportunity fire. By the time that everyone has finished moving, the Soviets have come considerably closer to their objectives. These may not be the most brilliant tactical moves ever made but it's always a good idea as the Soviet player to try and close the distance with NATO.
Here are the Soviet positions by the end of their activation:

With the Soviets finished their movements, we now start pulling chits from the cup. Because the Soviets did not have to pull their chit from the cup to start the game, there's a chance that they will pull their chit and get to go again.
The chit we get is: Team Yankee
The first thing we need to do as Team Yankee is to check if everyone is in command. Since the HQ took a hit from the opening arty barrage, the command range of the Team Yankee HQ is now reduced. Checking the little number in the lower left hand corner of the HQ counter, we see a "3" in a little lightning bolt. This tells us that the command range of Team Yankee is a 3 hex diameter so any units within 3 hexes will be in command and can do stuff while units outside this 3 hex range will have to roll to do stuff.
First off, the infantry w/ Dragon AT and M113 near Bergengipfel are 4 hexes from the HQ. They will have to roll for command. They need to roll two dice and score equal to or lower than the morale rating of the formation (the "7" located in the upper right hand corner of the HQ counter) to activate. So let's roll: 9. This is higher than the morale rating of Team Yankee so all the units in this hex are out of command (note that you do not roll for command for each unit in a hex - you just roll for the hex as a whole). They are marked with an "Out of Command" marker and they cannot do anything for this entire activation.
Now let's check the ITV for command. It is 5 hexes away from Team Yankee's HQ. We must roll for command. We get a "5" and the ITV is in command so it may fire or move this activation without any problem.
The last thing we need to do is to recover our disrupted Abrams tanks units. The procedure is similar to checking for command. We roll two dice and if the result is equal to or less than the morale rating then the Abrams tanks are no longer disrupted and may move and fire normally this activation. The one benefit to stacking with an HQ is that they get a bonus to their roll for checking disruption. In the upper left corner of the HQ counter, we see a little picture of six sided dice showing a "1" result. This means that we can subtract "1" from the disruption roll check for disrupted units stacked with an HQ. Let's roll: 2. The result is a 2 with a -1 for the HQ bonus so both Abrams easily recover and are no longer disrupted.
The Abrams on the hill looks for things to shoot and finds the 1st Tank HQ trying to hide in the smoke in J6. This is a great target for Team Yankee because taking out an HQ unit can really hurt the enemy (some formations are worse off than others for losing their HQ but we'll discuss that another time).
The Soviet HQ T-72s are at a range of 8, well within the "10" range listed for the Abrams so there will be no penalty for long range fire. However, there is still the issue of the smoke to deal with, which will incur a small +1 to hit penalty.
The two Abrams platoons are stacked with an HQ. The HQ can add its "1" bonus (as shown on the little dice on the HQ counter) to one of these platoons for an attack. The "1" is added to the firepower (4) of the first Abrams platoon for a total attack rating of 5 dice rolled for a 5+ to hit. The result: 6/6/1/6/1 The Abrams w/ HQ bonus have scored three hits on one of the hapless T-72 platoons sitting with the Soviet HQ. Of course, we have to roll for the Soviets defensive armor, 4 dice for 6 to negate hits. Result: 6/4/3/4
The T-72 platoon negates one hit but it still takes the other two hits. The first hit on the T-72 disrupts it and the second hit reduces it (flip the counter over). Since the HQ was stacked with the T-72s, we must roll for HQ disruption. The result is a "2", so the Soviet HQ is unscathed.
The other Abrams platoon stacked with the Team Yankee HQ can now fire. Note that the HQ bonus cannot be applied to this second attack because it was already used up with the previous shot. The other Abrams platoon fires at the second T-72 unit stacked with the Soviet HQ. This time we roll 4 dice for 5+. The result is 6/3/6/6. Wow! The Abrams scored 3 hits on the other T-72 platoon! Defensive roll for the T-72s is again 4 dice for 6. The result is 2/4/4/5. None of the hits are negated. The T-72 platoon has taken 3 or more hits so it is destroyed and the counter is removed from the game.
A wreck marker is put in hex J6 and we roll yet again for Soviet HQ disruption. Because the Soviet platoon was actually destroyed this time, the check for disruption suffers a -2 penalty so a 1, 2, or 3 result will reduce the Soviet HQ. We roll and get: 6. The Soviet HQ brushes off the attack without any problem.

Since we've been talking alot about HQs and disruption and attacking, it is worth reminding the reader that HQs cannot be targeted - only the units that they are stacked with may be targeted. Think of HQ units as an abstract characteristic/ability of the stack they are with rather than an independent functioning unit.
The last thing we do is get the ITV firing. Since it managed to hurt the T-72 platoon in J7 last time, it's going to try and hurt it again. We roll 4 attack dice for 5 or more (since the enemy unit is still in the smoke). The result is 6/5/1/6. The ITV has scored 3 hits on the hapless T-72 platoon! Defensive roll is 4 dice for 6. Result: 4/2/1/2. Oh no! The T-72 platoon is a smoldering heap of wrecks. A wreck marker is placed in the J7 hex and the destroyed T-72 unit is removed from the game.
Since the other units (infantry and M113s) in Team Yankee are out of command, they can do nothing but sit around and pick daisies for this activation. Everyone else has fired so we pull another chit. Now we can remove the "Out of Command" marker on Team Yankee's infantry. Note that it CAN opportunity fire if Soviets enter its range and LOS.
Chit pull! 1st Tank goes!
The first thing we do is check for command. All units are in a 4 hex range from the HQ unit so there is no need for any units to roll for command.
Now we try to recover disrupted units. The T-72 unit stacked with the Soviet HQ is disrupted (not to mention reduced) so it must roll for recovery. The Soviet HQ has not been affected at all by the high volume of fire sent its way by Team Yankee so, looking at its command bonus, we find a picture of a six sided die with the "2" side showing. This means that recovery checks get a -2 bonus to their roll for recovery. Again, recovering from disruption requires you to roll under or equal to the morale rating (indicated in the upper right corner of the Soviet HQ), which is a "6". Two dice are rolled and the total is: 10 - 2 = 8. The result is over the morale rating so the unit remains disrupted. Disrupted units cannot fire but they can move as long as they do not move closer to an enemy unit in LOS.
Units from Team Yankee which fired during its activation have been marked Ops Complete. Units which are Ops Complete cannot fire or move until the Ops Complete marker has been removed upon pulling their formation activation marker or the start of a new turn. As a result, the Soviets can pretty much move around the battlefield with impunity. The American infantry that was out of command last turn, however, has not been marked Ops Complete and is free to opportunity fire at any Soviets that enter their LOS and range.

Deciding to get rid of that pesky US infantry sitting just south of Bergengipfel, the Soviets send the T-72 platoon in K8 towards it.
As it moves adjacent to the US infantry, the T-72 comes under opportunity fire from the Americans.
The US infantry has a Dragon AT launcher with an attack roll that has a firepower of 3 and a "to hit" of 4. So the US player rolls 3 six-sided dice and hopes for 4+. The result is 3/3/1. Not only have the Americans failed to hit the adjacent Soviet unit, they are marked "Out of Ammo" since they have rolled zero hits on an attack and they are using missiles as opposed to shells or other ordnance. Note that the American ITV faces the same problem - any time these kinds of units score no hits, they are marked with an "Out of Ammo" marker and cannot fire with their missile-based weapons for two turns.
But it's not over for the American infantry yet. The US infantry has an inherent AP (armor piercing) attack on its own counter. So it can fire the support weapon plus its own firepower right now at the approaching T-72 platoon. The infantry's attack is 2 firepower (2 dice) with a 5+ for "to hit". The result is: 1 and 4. No hits.
The T-72 advances on to the Americans in the open hex. Because the US infantry is in the open and the Soviet is rushing into their hex with tanks, this is called an "Overrun", where the tanks get a special die bonus to their attack roll. Note that in an overrun, the attacking vehicles need at least enough movement points to exit the target hex. Since the Soviet tanks meet this requirement, we're in the clear and we can go ahead with the overrun.
First off, the T-72 assault factor is 2 dice firepower with 4+ to hit (in the lower right hand corner of the counter). Because this is an overrun attack, however, we triple this firepower so we're rolling 6 dice firepower for 4+ to hit. Let's do this! The result is 3/1/6/6/6/5
That's four hits on the infantry and the M113s! However, we do not inflict these hits yet! The infantry and the M113 now get a chance to roll for inflicting hits on the T-72.
First off, the infantry gets 3 firepower for 4+ to hit. The result is 2/2/5. That's one hit. The M113 gets a measly 1 die for 5+ and rolls a 3. Nada.
Now we score the hits. The T-72 platoon scored 4 hits and these are applied just like artillery hits, spread evenly among the occupants of a hex. The infantry is disrupted and reduced as is the M113.
The T-72 has taken one hit and is disrupted. Since it has been disrupted, the tank platoon must retreat into the hex from which it attacked, so we move it back to M8.
The American infantry, however, is about to learn that this was just a warmup. The Soviets send on a follow up of two T-72 platoons from J8. The T-72s go up the hill (2 Movement Points), cross to L7 (1 MP), down into the city of Bergengipfel (2 MPs for entering a city hex without using a road) and are now adjacent to the hapless American infantry/M113. Since they have 2 MPs left, they can conduct an overrun.

This time, the T-72s combined assault factor is 4 firepower for 4+ to hit. Since this is an overrun, we triple this to a total of 12 dice for 4+ to hit. Somehow, we only get 3 hits out of that but it will be enough to eliminate the M113 and the infantry. However, before we apply those hits and get ahead of ourselves, the infantry and M113 can roll for their attacks. Because the infantry and M113 are already disrupted in the previous assault, their "to hit" numbers are now raised to 6. So the infantry is rolling 2 dice for 6 to hit and the M113 is 1 die for 6. Infantry rolls: 1 and 5 for nothing but the M113 sneaks in a parting shot with a roll of 6. One of the T-72s is disrupted but the Americans are completely eliminated.
Due to the presence of an Armored Fighting Vehicle (an M113), we place a wreck in the hex where it went down fighting. The disrupted T-72 must retreat from the hex where it attacked from while the other T-72 platoon may exit the overrun hex.
Note that this fight probably would have gone much better for the infantry had they set up or moved into Bergengipfel since infantry in a city hex get a great bonus (+1 assault die, -1 to hit) when in assault combat against armored fighting vehicles. Bottom line: Try to keep your infantry in the cities or at least out of the clear hexes!
Having eliminated the American infantry, the Soviets decide to try and score some hits on the American Abrams units. The two T-72 platoons in K4 (on the hillside) move to L4 (wooded hill hex) and fire at the US HQ/Abrams hex.
Up until now, all of the firing in the game has been from a static position but World at War, being a modern combat game, also features moving fire ability for some units. Moving-fire capable units can move half of their MP movement allowance (rounded down) and still fire at an enemy. For most units, this means a penalty of -1 firepower and a +1 to hit. However, for some really hi-tech units like the M1 Abrams, the penalty is just +1 to hit.
The two T-72 units sneak into the bushes in L4 (costs 2 MP so still has enough MP left for moving fire) and aim for the M1 Abrams unit directly underneath the HQ. Both T-72 units roll 3 dice for 6 to hit. 1st T-72: 3/5/1 (no hits). 2nd T-72: 1/6/2. (1 hit).
The US Abrams rolls its defense, which is 3 dice for 5 or better. The result is 3/2/3. The T-72 hit is not negated and one of the Abrams units is disrupted. The American HQ must again roll for damage. The HQ rolls a "6" and it is not reduced nor eliminated.
The Soviet HQ, having had both of its stacked units nearly shot out from underneath it earlier in the turn, decides to move out of the American LOS. Although it is disrupted, it can still move as long as it does not move closer to an enemy unit in its LOS. It moves south to J8. With only one unit in its stack, it decides to stack with another T-72 unit for safety. The T-72 platoon in J5 moves south to J8 and joins the stack.
All Soviet units have either moved or fired so the activation is finished.
There are three chits left in the cup right now; two End Turn chits and one Team Yankee chit. If I pull Team Yankee, then I remove all their Ops Complete markers and they get to go again.
I pull: "End Turn"
I need to pull two "End Turn" markers for the turn to be over so there's still a chance that Team Yankee will activate. I pull another chit: "End Turn".
The turn marker advances to Turn 2 and we remove all Ops Complete markers from all the units. Smoke "2" markers are flipped to Smoke "1" side and "Out of Ammo 2" markers are flipped to their "Out of Ammo 1" side. All of the chits go back in the cup and we do it all over again.
Note that in case you don't pull a formation's chit before the two "End Turn" markers are pulled, you advance to the next turn and you put everything back in the chit cup but you keep out one of the "End Turn" markers. When you finally pull the formation that did not go last time, the "End Turn" marker is then added to the cup.
I hope this brief tutorial gives the novice WaW player some idea of how to play World at War: Eisenbach Gap. Although this example of play covered artillery, movement, overrun, chit pull mechanics, command, recovery, and opportunity fire, there are many other rules that I have not covered. My aim was not to provide an all-inclusive explanation of every rule but rather to add this example of play as a supplement to all the other great help out there on places like BGG, Consimworld, etc. (not to mention the rulebook itself!). If you spot any mistakes in this extended example of play (and I'm sure there's something I messed up), please feel free to let me know and I'll try to correct it soon.
So here goes - a detailed narrative of a single turn of play using "First Moves" as a learning scenario for World at War. I'm playing this on Vassal, which is not my favorite way of playing this particular game but it should work fine anyways.
In "First Moves", the Soviets have two victory objectives. They must capture the towns of Bergengipfel and Eisenbach. The Americans win if they can stop them. Note that the term "capture" denotes that a side was the last to move units through the hex. You don't need to keep your units in the hex all the time for it to be considered captured.
So let's look at the setup. Although there is more to the map than this, we'll be restricted basically to this play area.

The Soviet side gets the 1st Tank Division, which has one unit type only - the fearsome T-72 tank. The 1st Tank gets 10 platoons of T-72s plus a headquarters. HQs have various functions but their most important feature is the ability to command and send orders. Protecting your HQ and using it wisely is central to victory in World at War.

The American forces, on the other hand, couldn't be more different. Here we have Team Yankee, which consists of a varied bunch of units from M1 Abrams right down to infantry with handheld anti-tank launchers.

At first glance, it looks like 1st Tank is gonna roll over Team Yankee and spit out their treads but have no fear, American player! Team Yankee has two formation chits while the 1st Tank only has one chit. This means that the 1st Tank can only activate max once per turn while the Americans might activate up to twice in a single turn. This advantage reflects the better equipment, training, technology, and command flexibility of NATO over its Soviet adversaries.
Setup:
The American set up first on the map:

I put the infantry with the Dragon AT weapon and the M113s just south of Bergengipfel, ready to repel any attack into the city. Team Yankee and the HQ goes on the hill to the southwest of Eisenbach and the ITV is hanging out in the forest to the north of Eisenbach. As the NATO player, it's always a good idea to set your forces back from the Soviets as you have a real advantage with range.
Now it's time for 1st Tank to get set up. In this scenario, 1st Tank can set up forces anywhere within 3 hexes of hex C3, which is up in the northwest of the map.

The Soviets set up very aggressively, ready to strike at Team Yankee! Each T-72 platoon (1 counter = 1 platoon) is stacked with another T-72 counter (2 units max per hex at all times). The HQ does not count towards stacking limits and is stacked in the eastern part of the city with two T-72 counter.
This maybe isn't the greatest Soviet setup for this scenario, but hey, it's just a tutorial so that works fine.
Let's start the game, shall we?
Turn 1 Begins!:
The Soviets get to go first without having to pull a formation chit from the cup. Thanks to the surprise attack, NATO is caught off guard and the Russians activate. The first thing the Russian HQ does is call down artillery on the American Abrams and the HQ sitting exposed on the hillside just south of Eisenbach. The Soviets have 4 fire missions but they can only call in 2 per turn as the first action of the HQ unit. Only the HQ can call in artillery and it needs a line of sight to the target. All the requirements are made, so we roll to make sure the artillery lands in the target hex.
The Soviets roll a "2" and the HE lands right on top of the American HQ. Good opening, comrade! Now let's see if the artillery manages to score any hits.
 |
| Soviet HE arty lands in Team Yankee's hex R7. Note the HE marker has been moved to the north just so you can see the target units. |
The artillery is high explosive and is 3(4) power. This means we get to roll 3 six-sided dice. We need 4 or higher to score a hit. The dice come out as 3, 4, and 5. We manage to score 2 hits. Since the US units are not in any terrain that offers defensive cover, they don't get to roll to negate any hits. Since we have two units in the hex (the HQ does not count as a unit), the hits have to be distributed equally among them. As a result, each unit takes one hit so both Abrams units are disrupted.
Since the HQ unit has taken a hit, it must roll to see if it is damaged. On a roll of "1", the HQ will be reduced and this will affect it's command rating and abilities.
We roll a "1" and indeed the Americans HQ is damaged. We flip over the American HQ unit to see its new values.
 |
| Yankee HQ is reduced and the two Abrams units underneath are disrupted. |
It may be a much better idea to use one smoke mission for our next artillery strike so that the ITV sitting near Eisenbach cannot disrupt movement to the target.

The Soviet HQ calls for a smoke mission in K6. Once again, we must roll one die to see if the smoke mission lands on target. If we get a "6", the other player can move the smoke marker one hex in any direction. Lucky for the Soviets, they get a "1" and the smoke mission lands exactly where they want it. The smoke will remain for two turns before it clears and it covers the target hex and the six adjacent hexes. The ITV has thermal sights so it can still fire into the smoke but it's "to hit" rating is increased.
The Soviets start off by moving their HQ and the two tank platoon with which it is stacked down the road and into J6. This keeps the HQ out of LOS from the ITV's opportunity fire, which is a bit conservative for a Soviet player but it's always a good idea to be more careful with moving an HQ unit.

The rest of the 1st Tank units can now be moved in any order. Note that had we not called in artillery, we could have moved/fired any of the other units first before the HQ but because we led off with the artillery barrage from the HQ, we must now move it before the others or not at all for the remainder of the activation.
The tank units in E5 move towards the hill nearest Bergengipfel. As they enter hex J7, they are in LOS of Team Yankee's ITV unit. The ITV unit may use opportunity fire to shoot at one unit in the stack since the enemy T-72 platoons in J7 are in range and LOS (check LOS by stretching a thread or elastic from the center of the firing hex to the center of the target hex) of the ITV.
 |
| Sorry - the illustration should say J7 not J8. |
The ITV has a range of 20 hexes and rolls 4 dice for a 4 or above to hit. However, since the ITV is firing through the smoke, the "to hit" number is now 5 or above so we're rolling 4 dice for 5+ to hit. Let's go.
The ITV rolls a 6/4/1/1 on the dice. So we've scored one hit! Hooray for NATO! However, the Soviet tank platoon can now roll to negate the hit. Without any cover or concealment, the Soviet T-72 platoon rolls 4 dice and negates a hit on a roll of 6. The Soviets roll a 1/3/1/2 on the dice. The hit is not negated and one of the Soviet tank platoons in J7 is now disrupted. It may not move although the tank unit that it is stacked with may do so. It climbs the hill into hex K9. Since we're climbing a hill, this costs 2 movement points instead of 1 and the Soviet tank platoon stops, having expended all of its 7 movement points for this activation.

Now let's get all the rest of the guys moving. The Soviet tank platoons remain stacked throughout their movement and do not come under any opportunity fire. By the time that everyone has finished moving, the Soviets have come considerably closer to their objectives. These may not be the most brilliant tactical moves ever made but it's always a good idea as the Soviet player to try and close the distance with NATO.
Here are the Soviet positions by the end of their activation:

With the Soviets finished their movements, we now start pulling chits from the cup. Because the Soviets did not have to pull their chit from the cup to start the game, there's a chance that they will pull their chit and get to go again.
The chit we get is: Team Yankee
The first thing we need to do as Team Yankee is to check if everyone is in command. Since the HQ took a hit from the opening arty barrage, the command range of the Team Yankee HQ is now reduced. Checking the little number in the lower left hand corner of the HQ counter, we see a "3" in a little lightning bolt. This tells us that the command range of Team Yankee is a 3 hex diameter so any units within 3 hexes will be in command and can do stuff while units outside this 3 hex range will have to roll to do stuff.
First off, the infantry w/ Dragon AT and M113 near Bergengipfel are 4 hexes from the HQ. They will have to roll for command. They need to roll two dice and score equal to or lower than the morale rating of the formation (the "7" located in the upper right hand corner of the HQ counter) to activate. So let's roll: 9. This is higher than the morale rating of Team Yankee so all the units in this hex are out of command (note that you do not roll for command for each unit in a hex - you just roll for the hex as a whole). They are marked with an "Out of Command" marker and they cannot do anything for this entire activation.
Now let's check the ITV for command. It is 5 hexes away from Team Yankee's HQ. We must roll for command. We get a "5" and the ITV is in command so it may fire or move this activation without any problem.
The last thing we need to do is to recover our disrupted Abrams tanks units. The procedure is similar to checking for command. We roll two dice and if the result is equal to or less than the morale rating then the Abrams tanks are no longer disrupted and may move and fire normally this activation. The one benefit to stacking with an HQ is that they get a bonus to their roll for checking disruption. In the upper left corner of the HQ counter, we see a little picture of six sided dice showing a "1" result. This means that we can subtract "1" from the disruption roll check for disrupted units stacked with an HQ. Let's roll: 2. The result is a 2 with a -1 for the HQ bonus so both Abrams easily recover and are no longer disrupted.
 |
| US infantry in N7 is out of command. ITV is in command. Abrams units with HQ recover from disruption. |
The Soviet HQ T-72s are at a range of 8, well within the "10" range listed for the Abrams so there will be no penalty for long range fire. However, there is still the issue of the smoke to deal with, which will incur a small +1 to hit penalty.
The two Abrams platoons are stacked with an HQ. The HQ can add its "1" bonus (as shown on the little dice on the HQ counter) to one of these platoons for an attack. The "1" is added to the firepower (4) of the first Abrams platoon for a total attack rating of 5 dice rolled for a 5+ to hit. The result: 6/6/1/6/1 The Abrams w/ HQ bonus have scored three hits on one of the hapless T-72 platoons sitting with the Soviet HQ. Of course, we have to roll for the Soviets defensive armor, 4 dice for 6 to negate hits. Result: 6/4/3/4
The T-72 platoon negates one hit but it still takes the other two hits. The first hit on the T-72 disrupts it and the second hit reduces it (flip the counter over). Since the HQ was stacked with the T-72s, we must roll for HQ disruption. The result is a "2", so the Soviet HQ is unscathed.
The other Abrams platoon stacked with the Team Yankee HQ can now fire. Note that the HQ bonus cannot be applied to this second attack because it was already used up with the previous shot. The other Abrams platoon fires at the second T-72 unit stacked with the Soviet HQ. This time we roll 4 dice for 5+. The result is 6/3/6/6. Wow! The Abrams scored 3 hits on the other T-72 platoon! Defensive roll for the T-72s is again 4 dice for 6. The result is 2/4/4/5. None of the hits are negated. The T-72 platoon has taken 3 or more hits so it is destroyed and the counter is removed from the game.
A wreck marker is put in hex J6 and we roll yet again for Soviet HQ disruption. Because the Soviet platoon was actually destroyed this time, the check for disruption suffers a -2 penalty so a 1, 2, or 3 result will reduce the Soviet HQ. We roll and get: 6. The Soviet HQ brushes off the attack without any problem.

Since we've been talking alot about HQs and disruption and attacking, it is worth reminding the reader that HQs cannot be targeted - only the units that they are stacked with may be targeted. Think of HQ units as an abstract characteristic/ability of the stack they are with rather than an independent functioning unit.
The last thing we do is get the ITV firing. Since it managed to hurt the T-72 platoon in J7 last time, it's going to try and hurt it again. We roll 4 attack dice for 5 or more (since the enemy unit is still in the smoke). The result is 6/5/1/6. The ITV has scored 3 hits on the hapless T-72 platoon! Defensive roll is 4 dice for 6. Result: 4/2/1/2. Oh no! The T-72 platoon is a smoldering heap of wrecks. A wreck marker is placed in the J7 hex and the destroyed T-72 unit is removed from the game.
 |
| The ITV fires on the T-72 in J8 and destroys it, leaving a "Wreck" marker in the target hex. |
Since the other units (infantry and M113s) in Team Yankee are out of command, they can do nothing but sit around and pick daisies for this activation. Everyone else has fired so we pull another chit. Now we can remove the "Out of Command" marker on Team Yankee's infantry. Note that it CAN opportunity fire if Soviets enter its range and LOS.
Chit pull! 1st Tank goes!
The first thing we do is check for command. All units are in a 4 hex range from the HQ unit so there is no need for any units to roll for command.
Now we try to recover disrupted units. The T-72 unit stacked with the Soviet HQ is disrupted (not to mention reduced) so it must roll for recovery. The Soviet HQ has not been affected at all by the high volume of fire sent its way by Team Yankee so, looking at its command bonus, we find a picture of a six sided die with the "2" side showing. This means that recovery checks get a -2 bonus to their roll for recovery. Again, recovering from disruption requires you to roll under or equal to the morale rating (indicated in the upper right corner of the Soviet HQ), which is a "6". Two dice are rolled and the total is: 10 - 2 = 8. The result is over the morale rating so the unit remains disrupted. Disrupted units cannot fire but they can move as long as they do not move closer to an enemy unit in LOS.
Units from Team Yankee which fired during its activation have been marked Ops Complete. Units which are Ops Complete cannot fire or move until the Ops Complete marker has been removed upon pulling their formation activation marker or the start of a new turn. As a result, the Soviets can pretty much move around the battlefield with impunity. The American infantry that was out of command last turn, however, has not been marked Ops Complete and is free to opportunity fire at any Soviets that enter their LOS and range.

Deciding to get rid of that pesky US infantry sitting just south of Bergengipfel, the Soviets send the T-72 platoon in K8 towards it.
As it moves adjacent to the US infantry, the T-72 comes under opportunity fire from the Americans.
 |
| T-72 unit moves adjacent to US infantry near Bergengipfel |
The US infantry has a Dragon AT launcher with an attack roll that has a firepower of 3 and a "to hit" of 4. So the US player rolls 3 six-sided dice and hopes for 4+. The result is 3/3/1. Not only have the Americans failed to hit the adjacent Soviet unit, they are marked "Out of Ammo" since they have rolled zero hits on an attack and they are using missiles as opposed to shells or other ordnance. Note that the American ITV faces the same problem - any time these kinds of units score no hits, they are marked with an "Out of Ammo" marker and cannot fire with their missile-based weapons for two turns.
 |
| US scores zero hits on its to-hit roll and runs out of ammo for two turns. |
But it's not over for the American infantry yet. The US infantry has an inherent AP (armor piercing) attack on its own counter. So it can fire the support weapon plus its own firepower right now at the approaching T-72 platoon. The infantry's attack is 2 firepower (2 dice) with a 5+ for "to hit". The result is: 1 and 4. No hits.
The T-72 advances on to the Americans in the open hex. Because the US infantry is in the open and the Soviet is rushing into their hex with tanks, this is called an "Overrun", where the tanks get a special die bonus to their attack roll. Note that in an overrun, the attacking vehicles need at least enough movement points to exit the target hex. Since the Soviet tanks meet this requirement, we're in the clear and we can go ahead with the overrun.
First off, the T-72 assault factor is 2 dice firepower with 4+ to hit (in the lower right hand corner of the counter). Because this is an overrun attack, however, we triple this firepower so we're rolling 6 dice firepower for 4+ to hit. Let's do this! The result is 3/1/6/6/6/5
That's four hits on the infantry and the M113s! However, we do not inflict these hits yet! The infantry and the M113 now get a chance to roll for inflicting hits on the T-72.
First off, the infantry gets 3 firepower for 4+ to hit. The result is 2/2/5. That's one hit. The M113 gets a measly 1 die for 5+ and rolls a 3. Nada.
Now we score the hits. The T-72 platoon scored 4 hits and these are applied just like artillery hits, spread evenly among the occupants of a hex. The infantry is disrupted and reduced as is the M113.
The T-72 has taken one hit and is disrupted. Since it has been disrupted, the tank platoon must retreat into the hex from which it attacked, so we move it back to M8.
 |
| Overrun: The Aftermath |
The American infantry, however, is about to learn that this was just a warmup. The Soviets send on a follow up of two T-72 platoons from J8. The T-72s go up the hill (2 Movement Points), cross to L7 (1 MP), down into the city of Bergengipfel (2 MPs for entering a city hex without using a road) and are now adjacent to the hapless American infantry/M113. Since they have 2 MPs left, they can conduct an overrun.

This time, the T-72s combined assault factor is 4 firepower for 4+ to hit. Since this is an overrun, we triple this to a total of 12 dice for 4+ to hit. Somehow, we only get 3 hits out of that but it will be enough to eliminate the M113 and the infantry. However, before we apply those hits and get ahead of ourselves, the infantry and M113 can roll for their attacks. Because the infantry and M113 are already disrupted in the previous assault, their "to hit" numbers are now raised to 6. So the infantry is rolling 2 dice for 6 to hit and the M113 is 1 die for 6. Infantry rolls: 1 and 5 for nothing but the M113 sneaks in a parting shot with a roll of 6. One of the T-72s is disrupted but the Americans are completely eliminated.
Due to the presence of an Armored Fighting Vehicle (an M113), we place a wreck in the hex where it went down fighting. The disrupted T-72 must retreat from the hex where it attacked from while the other T-72 platoon may exit the overrun hex.
 |
| "From Hell's heart, I stab at thee." The M113 scores a hit and disrupts one T-72 before going down fighting. |
Note that this fight probably would have gone much better for the infantry had they set up or moved into Bergengipfel since infantry in a city hex get a great bonus (+1 assault die, -1 to hit) when in assault combat against armored fighting vehicles. Bottom line: Try to keep your infantry in the cities or at least out of the clear hexes!
Having eliminated the American infantry, the Soviets decide to try and score some hits on the American Abrams units. The two T-72 platoons in K4 (on the hillside) move to L4 (wooded hill hex) and fire at the US HQ/Abrams hex.
 |
| Moving fire: T-72s move to take a shot at the US HQ/Abrams hex. |
Up until now, all of the firing in the game has been from a static position but World at War, being a modern combat game, also features moving fire ability for some units. Moving-fire capable units can move half of their MP movement allowance (rounded down) and still fire at an enemy. For most units, this means a penalty of -1 firepower and a +1 to hit. However, for some really hi-tech units like the M1 Abrams, the penalty is just +1 to hit.
The two T-72 units sneak into the bushes in L4 (costs 2 MP so still has enough MP left for moving fire) and aim for the M1 Abrams unit directly underneath the HQ. Both T-72 units roll 3 dice for 6 to hit. 1st T-72: 3/5/1 (no hits). 2nd T-72: 1/6/2. (1 hit).
The US Abrams rolls its defense, which is 3 dice for 5 or better. The result is 3/2/3. The T-72 hit is not negated and one of the Abrams units is disrupted. The American HQ must again roll for damage. The HQ rolls a "6" and it is not reduced nor eliminated.
The Soviet HQ, having had both of its stacked units nearly shot out from underneath it earlier in the turn, decides to move out of the American LOS. Although it is disrupted, it can still move as long as it does not move closer to an enemy unit in its LOS. It moves south to J8. With only one unit in its stack, it decides to stack with another T-72 unit for safety. The T-72 platoon in J5 moves south to J8 and joins the stack.
 |
| Soviet 1st Tank HQ limps south with reduced/disrupted unit. |
 |
| The other T-72 from J5 joins the stack. |
All Soviet units have either moved or fired so the activation is finished.
There are three chits left in the cup right now; two End Turn chits and one Team Yankee chit. If I pull Team Yankee, then I remove all their Ops Complete markers and they get to go again.
I pull: "End Turn"
I need to pull two "End Turn" markers for the turn to be over so there's still a chance that Team Yankee will activate. I pull another chit: "End Turn".
The turn marker advances to Turn 2 and we remove all Ops Complete markers from all the units. Smoke "2" markers are flipped to Smoke "1" side and "Out of Ammo 2" markers are flipped to their "Out of Ammo 1" side. All of the chits go back in the cup and we do it all over again.
 |
| Beginning of Turn 2. Ready to go. |
Note that in case you don't pull a formation's chit before the two "End Turn" markers are pulled, you advance to the next turn and you put everything back in the chit cup but you keep out one of the "End Turn" markers. When you finally pull the formation that did not go last time, the "End Turn" marker is then added to the cup.
I hope this brief tutorial gives the novice WaW player some idea of how to play World at War: Eisenbach Gap. Although this example of play covered artillery, movement, overrun, chit pull mechanics, command, recovery, and opportunity fire, there are many other rules that I have not covered. My aim was not to provide an all-inclusive explanation of every rule but rather to add this example of play as a supplement to all the other great help out there on places like BGG, Consimworld, etc. (not to mention the rulebook itself!). If you spot any mistakes in this extended example of play (and I'm sure there's something I messed up), please feel free to let me know and I'll try to correct it soon.
Nice work - that should be helpful for the newbie
ReplyDeleteThanks! Maybe I'll do up another one to cover all the stuff I missed (helicopters, assaults, etc.)
Deleteanother nice job. I'll link to it over at BigBoard if that is ok?
ReplyDeleteSure! Thanks Kev.
DeleteVery nice report! As a newbie to WaW, I appreciate it. Given your experience with the system, which game would be best for a beginner? Eisenbach Gap or maybe Untold Stories?
ReplyDeleteThanks Ken! I would recommend Eisenbach Gap for a new player since it has a very small ruleset without lots of bells and whistles and gives you the basics you need to dive into the other modules. TUS is a great game and the scenarios are top-notch too but I always find myself returning to Eisenbach Gap mostly due to its beautiful simplicity.
DeleteThanks for the recommendation! I'll see if I can still get into the pre-order for Eisenbach Gap Deluxe.
DeleteNo problem! I hope you enjoy it, Ken.
DeleteDo you get a commission from LnL? If not, you should. ;-)
DeleteThanks Ken! I get nothing from LnL. This blog is just a labor of love and a nice way to keep up my writing skills.
DeleteI have Blood and Bridges and even after punching out the counters and organizing them into trays it's been unplayed. Thanks to your writeups which clarify a lot of game concepts I think I'm finally going to be playing Blood and Bridges which should more than adequately prepare me for the simpler Eisenbach Gap. Thanks again for the tutorials and hope to read more from you!
ReplyDeleteDo you have more tutorials planned? You really break down the game concepts well! (also your blog isn't blocked at work yet so it makes for entertaining reading)
Thanks very much! I'm glad these articles have helped you get up and going with the game. I'll definitely be continuing with the tutorials and providing examples over the next few weeks. Please let me know if anything's unclear or you have any questions!
ReplyDeleteNice comprehensive play through Brad. How does this one play solitaire?
ReplyDeleteThis is a terrific game for solitaire! It has a blind chit-pull mechanic that basically determines which side goes and when during a turn. There's no real hidden information. I always play this solitaire myself and it goes very smoothly.
DeleteGood to know thanks. Which is your favorite squad level game?
DeleteWell, for squad level, I would have to say I really enjoy the Lock 'n Load series. Since I'm a big fan of the WW3 type of stuff, I'm partial to Heroes of the Gap. I also like Forgotten Heroes: Vietnam and their WW2 offering, Band of Heroes. How about you?
DeleteYes, I'm partial to Forgottne Heroes too. I just ordered the ANZAC module before it sells out again. I love the art work, history and mechanics of the lock n load series as well. Though my understanding of the system is still lacking. Heroes of Stalingrad helps some on the learning curve, but it's not the same as having the mapboard out.
Delete