Well, you've read the
history, now it's time for the report!
This is a 13-turn affair that involves three forces; the US Marines and the Republic of South Vietnam are up against the K-500 Battalion of North Vietnamese Army regulars. Four maps are involved with a nice variety of terrain. In the northwest, we have some very heavy jungle and east of that, we have lighter jungle with a small village. The scenario doesn't say which side sets up first (oops!) but I'm just guessing based on my own LnL experience that it's the NVA.
NVA force 1 consists of 8 squads with a 60mm mortar team set up on map board 1 to the northeast. Two units with RPGs are set up in the kunai grass to the south of the village in an attempt to keep the American Amtracs at bay should they attempt a head-on attack from the south.
NVA force 2 also has 8 squads and they are set up in the jungles on board 9. A recoilless rifle and a platoon of men are set up along the road to ambush the American Amtracs should they try to come up the road. Another platoon is set up slightly to the west and it will be used to attack the nearby South Vietnamese troops.
The South Vietnamese (ARVN) forces set up on board 9 quite near the NVA. They get 6 squads and some light weapons. Without assault move capability, they are outgunned as well as outnumbered by their North Vietnamese enemies. Clearly, they will not last long against a sustained NVA assault.
Cue the US Marine Corps, which will be sending elements of the 1st Amtrac Battalion up from the south side of the board on turn 1. They get a few Amtracs with .30 cal machineguns and one Amtrac with a 106mm howitzer. The Marines also have a decent amount of hard-chargin' 2-6-4 and 3-6-4 squads to take on the North Vietnamese.
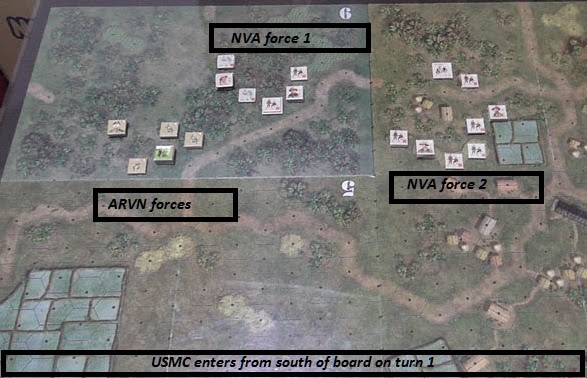 |
| A view from afar: The board all set up and ready to go before turn 1. |
Turns 1 & 2:
The USMC comes on to the board first, entering with all squads mounted on the three .30 cal Amtracs. The Americans approach on a broad front on both board 5 and board 2, spread out from east to west. Lt. Reagin and his two squads dismount in the light jungle just south of NVA force 2 and they get hammered by a double whammy of accurate RPD machine gun fire and 130mm artillery. While the Marines lose a half squad and suffer a wounded leader and a shaken full squad, they do manage to get a hero with the "Multifaceted" hero trait. He pulls two cards and gets "Loner" and "Veteran" - a deadly combination that may prove instrumental in the hard fight ahead.
 |
| Lt. Reagin and his squads on board 1 in trouble. |
Meanwhile, far to the left, the NVA trade a squad to get a better position on the South Vietnamese on board 9. Advancing through the heavy jungle using assault movement, they get close enough to make Sgt.Dunk nervous and he pulls a squad back with him towards board 5, hoping to coordinate movement and fire with the Marines to the south. A nearby 75mm recoilless rifle spoils these plans, however, as it fires at the moving squad in the nearby trees. A "2" is rolled to hit and the damage rolls shake both Dunk and his squad. The NVA follow this up with a devastating melee from an NVA leader and two squads who eliminate the South Vietnamese leader and his men.
 |
| Lt. Khai eliminates Sgt. Dunk on board 9. |
Much of the second turn is spent with the NVA slowly moving forces south to hit at Lt. Ho and his men but the NVA lose another squad to a South Vietnamese assault.
 |
| Beginning of turn 2 |
The Marines offer some assistance against NVA force 2 by driving up an Amtrac adjacent to an NVA leader and squad. The .30 cal machinegun fire shakes the NVA leader and his men. Things seem to be going reasonably well on the American/South Vietnamese left flank.
 |
| Marines on the left flank start moving up to help out the South Vietnamese vs. the NVA |
Having said that, however, the right Marine flank is in jeopardy. Peters sends a Marine hero off to melee an adjacent NVA squad after shaking it up but the NVA take this opportunity to advance a platoon of men straight towards the Marine flank, seriously jeopardizing the Americans on board 2. Now they are practically surrounded! To add insult to injury, the NVA manage to shake up an Amtrac providing cover for the Marines. Things look very shaky right now for the USMC right flank.
 |
| Marines in serious trouble as NVA force 2 maneuvers around their right flank. |
Turns 3 & 4:
The Americans need to work hard to save their flank here but that will mean easing the pressure from other areas of the board first. The South Vietnamese on board 9 begin turn 3 by eliminating the NVA's 75mm recoilless rifle in melee. The NVA respond by pushing their squads at the fragile American right flank. A 2-5-4 NVA squad with an RPD easily eliminates the hero adjacent to Lt. Reagin's position.
The Americans try to preserve their infantry by sending the Amtracs around to sow chaos. One of them cuts over to the right and hits at Lt. Thien and his squads poised behind the Marine flank. The NVA start sending more men down south from board 1 to board 2 and their grip is tightening around Reagin's precarious position. The US responds by sending over another Amtrac from the left flank to prevent further envelopment. However, the NVA simply take this opportunity to fire at and shake yet another Amtrac (now there are two shaken Amtracs on the board). This isn't turning out well at all.
 |
| NVA close in on the American right flank. The US tries to hold on by using Amtracs but they get shaken. |
Things do turn around a bit as the Americans score some minor success in the center of the board. Capt. Peters and his men manage to advance into the jungle and eliminate an NVA squad. Now they hold a spearhead position with a small force that can be used to threaten the NVA on either board 1 or 2.
 |
| Capt. Peters and his men advance on the left flank against the NVA on board 9. |
It's pure chaos as the Marines advance on the left and just barely hold on to the right. If Reagin and his squads go down, the left flank will be surrounded and collapse with it.
By turn 4, things start to slowly come back the Americans' way. They manage to make their rally rolls (except for one of the Amtracs) and Reagin directs his squads to shake and then melee an adjacent NVA squad. Lt. Ho makes his rally roll and heads back north into the fight on board 9 and a single 2-4-4 ARVN squad fends off an entire platoon of NVA moving up adjacent and assault moving on them. The ARVN defense is helped out by accurate fire from the 106mm howitzer mounted on one of the Amtracs.
 |
| Lt. Ho's ARVN forces and the US Marines keep up the fire on the left flank. |
The NVA also get their licks in. Lt. Thien fires on and shakes up an adjacent Amtrac while one NVA squad goes for broke and attempts to melee Reagin's hex, which only has a single half-squad and an M-60 in it. The melee is undecided as both sides miss their elimination rolls. Captain Peters, seeing that the situation on the left flank seems to be under control for now, rushes towards the right flank to help bolster the Marines' numbers.
 |
| Right flank: The NVA shake up an Amtrac and send in a 2-5-4 squad to melee Lt. Reagin and his men in hex N5. |
The game still has 9 more turns left in it so things are far from decided at this point. I'll hopefully be posting part 2 in the next few days so tune in!
Update:
Part 2 is here!


Wow. This is a massive scenario. The ARVN are doing a respectable job. I can't tell which way this one is going to go. Are there any reinforcements expected?
ReplyDeleteHi Jason! The ARVN were in serious trouble in the early turns but managed to hold on. No reinforcements coming! Everybody brought all their friends and toys with them on turn 1!
Delete