Band of Heroes - Swift & Bold: Expected Company
LnL's Swift and Bold is an expansion to their squad-based WW2 wargame, Band of Heroes. Swift & Bold features the British forces, vehicles, and even gliders. There are about a dozen new scenarios in the expansion with brand new counters. Players can use the maps already provided with Band of Heroes and the scenarios here are really nicely crafted. Most of the scenarios are a bit smaller and have fewer units but there are a couple of real slug-fests for those who enjoy those big battles with everything but the kitchen sink in there.
Today, I just finished a scenario from Swift and Bold called "Expected Company". It's the day after D-day and the British paras are defending against a German counter-attack. The Germans have to clear the roadside in the middle of the board while the Brits try to stop them. For a variety of reasons, I think this scenario shows what can go wrong when you get too fixated on one goal and blind yourself to what the enemy is doing.
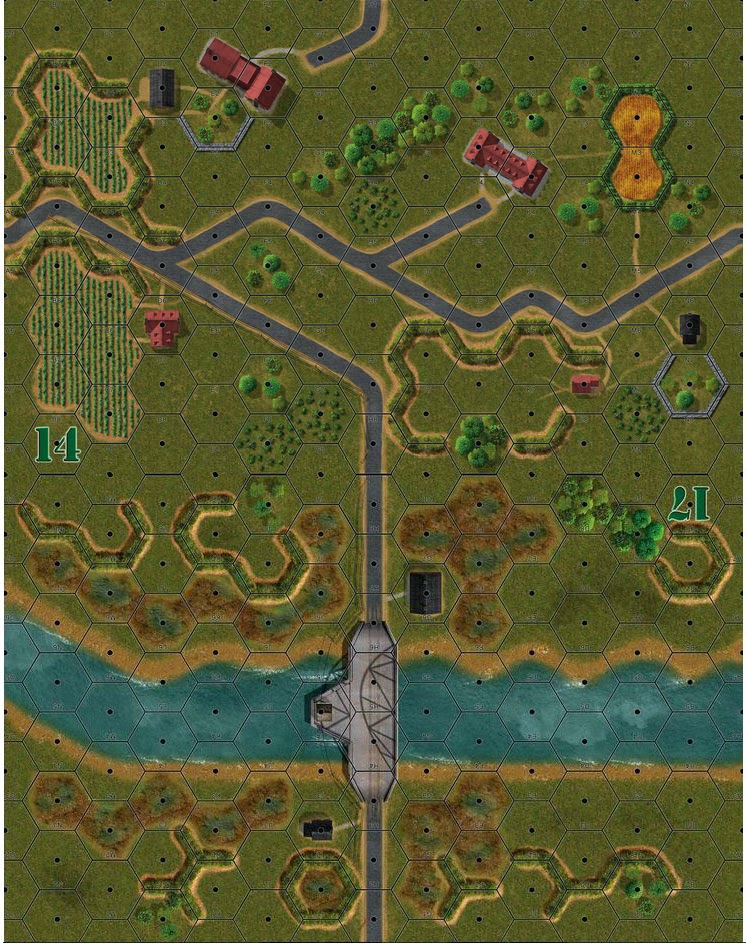
The scenario takes place on just one map board. I set the Brits up in the forest and houses in the upper left of the map while a 57mm anti-tank gun sits in a foxhole in some light woods. They await the German onslaught.
As the Germans poured onto the board, the British held their fire, trying to make every shot count. Two Stug IIIs rumbled onto the road while a Marder skirted around to the north. As the Stug tank commanders scanned the area for trouble, the welcome wagon started by firing a 57mm AT shell at them. The AT shell slammed into the front of one Stug, and a few seconds later, smoke started belching from somewhere inside. The German tank crew quickly abandoned their vehicle and raced for cover. So much for British understatement. Lord Holmes smiled.
The remaining Stug returned fire at the 57mm gun but found no purchase in its efforts. Still, it was only a matter of time before the German tanks zeroed in on their target.
With Lord Holmes' men busy near the edge of the forest, the German infantry began pouring troops into the nearby house. Seeing his mistake, he ordered his nearby squad to take the house and defend it from the approaching Germans. However, as one advance squad entered the wooden lodge, they were quickly overwhelmed. Things didn't seem to be going their way today, thought Lord Holmes.
Meanwhile, Pvt. Chapman and his men fired helplessly at the Stug to the south but were completely unable to score any effective hits. With their position given away, it was only a matter of time before something bad happened. It finally did. The Marder and the Stug opened up on his position, sending his squad scrambling for cover. He turned around in his slit trench to witness one of his men get a bayonet thrust into him. A German soldier was in his position, wreaking havoc. Suddenly, more Germans flooded into the woods around him. He fired wildly, felling two or three enemies before everything went dark.
Today, I just finished a scenario from Swift and Bold called "Expected Company". It's the day after D-day and the British paras are defending against a German counter-attack. The Germans have to clear the roadside in the middle of the board while the Brits try to stop them. For a variety of reasons, I think this scenario shows what can go wrong when you get too fixated on one goal and blind yourself to what the enemy is doing.
The scenario takes place on just one map board. I set the Brits up in the forest and houses in the upper left of the map while a 57mm anti-tank gun sits in a foxhole in some light woods. They await the German onslaught.
 |
| Lord Holmes and our hero, Chapman, set up and wait for the Germans. |
As the Germans poured onto the board, the British held their fire, trying to make every shot count. Two Stug IIIs rumbled onto the road while a Marder skirted around to the north. As the Stug tank commanders scanned the area for trouble, the welcome wagon started by firing a 57mm AT shell at them. The AT shell slammed into the front of one Stug, and a few seconds later, smoke started belching from somewhere inside. The German tank crew quickly abandoned their vehicle and raced for cover. So much for British understatement. Lord Holmes smiled.
 |
| A British AT gun hits home and puts one German Stug out of commission. |
The remaining Stug returned fire at the 57mm gun but found no purchase in its efforts. Still, it was only a matter of time before the German tanks zeroed in on their target.
Lord Holmes heard the nearby rumble of an approaching vehicle and peered out from behind a fallen tree to see a nearby Marder. The tank was deliciously close and he urged his men forward out of their cover to close assault it. As the men poured out of the woods and fired at the nearby Marder, their grenades landed short and the vehicle commander saw the troops attempting to encircle him. Their ruse spoiled, the Marder pulled back and fired several shots at the British troops. Lord Holmes quickly brought his troops back into cover.
 |
| Lord Holmes unsuccessfully attempts to close assault the adjacent Marder. |
With Lord Holmes' men busy near the edge of the forest, the German infantry began pouring troops into the nearby house. Seeing his mistake, he ordered his nearby squad to take the house and defend it from the approaching Germans. However, as one advance squad entered the wooden lodge, they were quickly overwhelmed. Things didn't seem to be going their way today, thought Lord Holmes.
 |
| Germans flood into the house near Lord Holmes' position. |
The nearby Marder began firing again and again into the forest. Shrapnel from the blasts flew everywhere, maiming some of Holmes' men and sending others panicking to find cover. All composure was completely lost. Further to the west, Pvt. Chapman began directing his fellow squad mates to fire at a German squad that had hunkered down near a German Stug. To his amazement, the firing was completely ineffective and some brave German soul dashed out from cover to eliminate the 57mm anti-tank gun. It was hard to believe. One minute, the anti-tank gun had been firing happily away at the Germans and the next minute, it was a pile of scrap after a single German ran into the position.
Finally, Lord Holmes gathered his men back under control and they formulated a quick plan for an assault on the Marder tank. Hoping that destroying the second German tank would demoralize the Germans, the British hopped from cover and made a desperate dash towards the Marder. One of their best men nearly got close enough to it to lay a charge but again the German tank commander saw through their tactics, withdrawing from the British approach and firing at them with carefully aimed shots.
As Holmes and his men pulled back to the forest, he suddenly spotted several German squads sitting in the British positions. He barely had time to mouth a curse word before Sgt. Baumann and his men cut the British troops to pieces with MG34 and small arms fire.
 |
| Lord Holmes is killed in melee while the hero, Chapman, barely hangs on. |
Meanwhile, Pvt. Chapman and his men fired helplessly at the Stug to the south but were completely unable to score any effective hits. With their position given away, it was only a matter of time before something bad happened. It finally did. The Marder and the Stug opened up on his position, sending his squad scrambling for cover. He turned around in his slit trench to witness one of his men get a bayonet thrust into him. A German soldier was in his position, wreaking havoc. Suddenly, more Germans flooded into the woods around him. He fired wildly, felling two or three enemies before everything went dark.
Lt. Koch reached the small shack with his squad. They had been using overwatch to carefully arrive at the door. Inside was a small determined band of Brits. He hoped it was the last group. The Paras were tough fighters, especially at close range. While the other squads had loosed their fire early at them and given away their approach, Koch and his men took the opposite tack, gingerly approaching the door. After they got close enough without encountering any fire, they crept to the windows and threw in the grenades. Several mighty explosions rang out and Koch's men, well-trained soldiers from the 21st Panzer, leapt inside. Bloody fighting ensued there in the shack and in the end, Koch walked out with only half his men alive but with the shack secured. The road was open now thanks to their efforts and the Germans now had a way to push the invaders back to the sea.
 |
| The last British Para squad holds off the Germans but is eventually overwhelmed. |
Very close game! The British really did hold on to the very end but were completely eliminated at the close of turn 7. Even with the death of the only real leader (Holmes), the Brits managed to stick it out quite well. It's a very tough scenario since the Germans have a ton of ordnance and if they concentrate on one target, they can really mess it up badly. The Brits had some real unlucky breaks. By all accounts, Lord Holmes and his men should have destroyed that Marder in all those close assault attempts but the dice just would not work in their favor. This was also true of attempts to shake up the second German Stug. It's important to note that, in this scenario, if the British manage to destroy two German tanks, it forces the rest of their men to make a morale check or be shaken. Thinking back on it, the Brits should have tried for two Shaken results against the Marder by using small arms fire rather than using close assault.
Unfortunately, the British concentrated so much on getting that second tank destroyed that they lost all focus on what the German infantry were doing and basically got overwhelmed. After the 57mm took out the first Stug, the dice just refused to help the British out in any way at all. This a pretty good scenario and I find that the win/loss rate for both sides is about 50/50. With such a small map and few forces on each side, there isn't much room for mistakes but the close-in fighting makes for some very intense action.
Comments
Post a Comment